How to Fix a Faulty Wall Socket (Simple Home Guide That Actually Helps)
You plug in your charger… nothing happens.
You try another device… still dead.
Now you’re wondering: “Is my wall socket spoiled or is it something serious?”
This is one of the most common home electrical problems—and yes, it’s usually fixable.
The Problem You’re Facing
A faulty wall socket can show up in different ways:
- No power at all
- Plug keeps falling out loosely
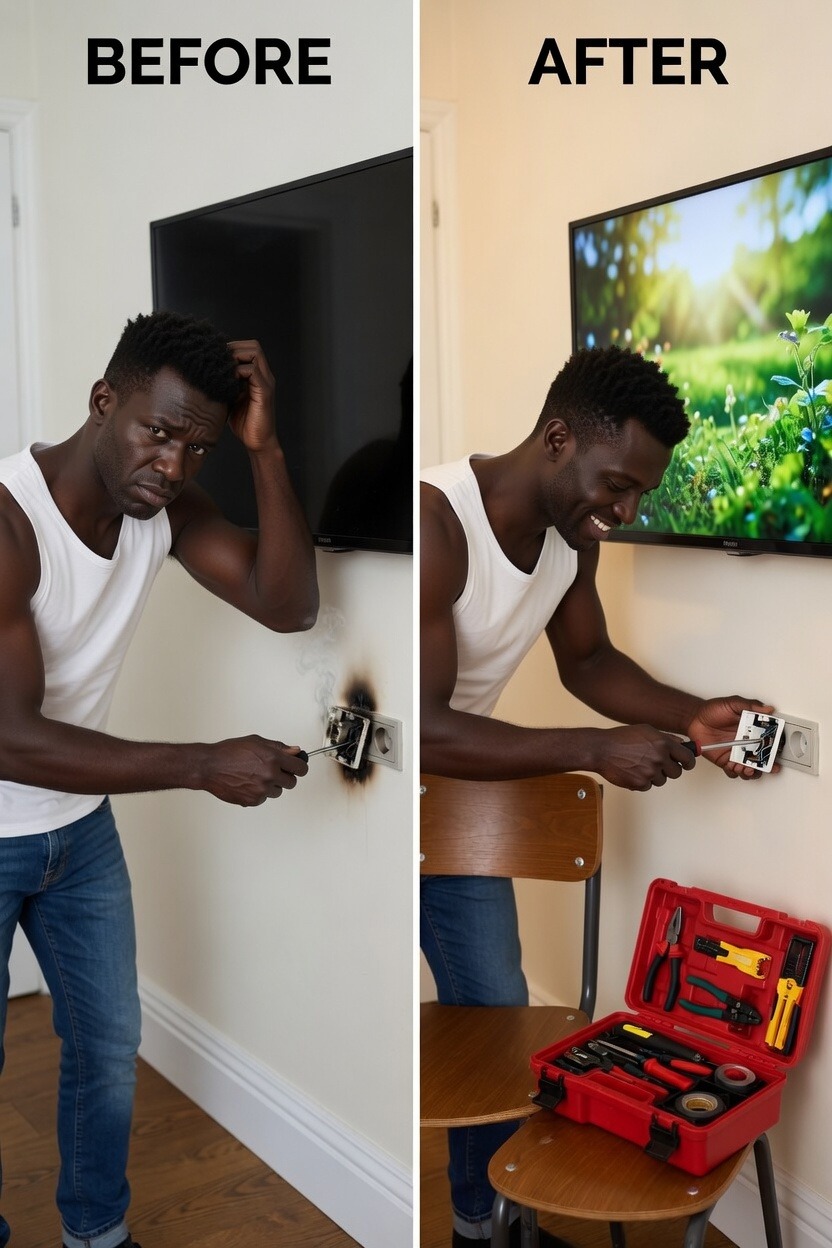
- Spark or burning smell when used
- Works sometimes, fails sometimes
It’s frustrating because it can stop your entire room or kitchen from working properly—and most people don’t know if it’s the socket, wiring, or the power line.
The Simple Solution (What’s Really Going On)
Most socket issues come from:
- Loose wiring behind the socket
- Worn-out socket unit
- Overload or poor installation
- Damaged internal connection
Good news: in many cases, it’s not the whole house wiring—it’s just the socket unit or a loose connection.
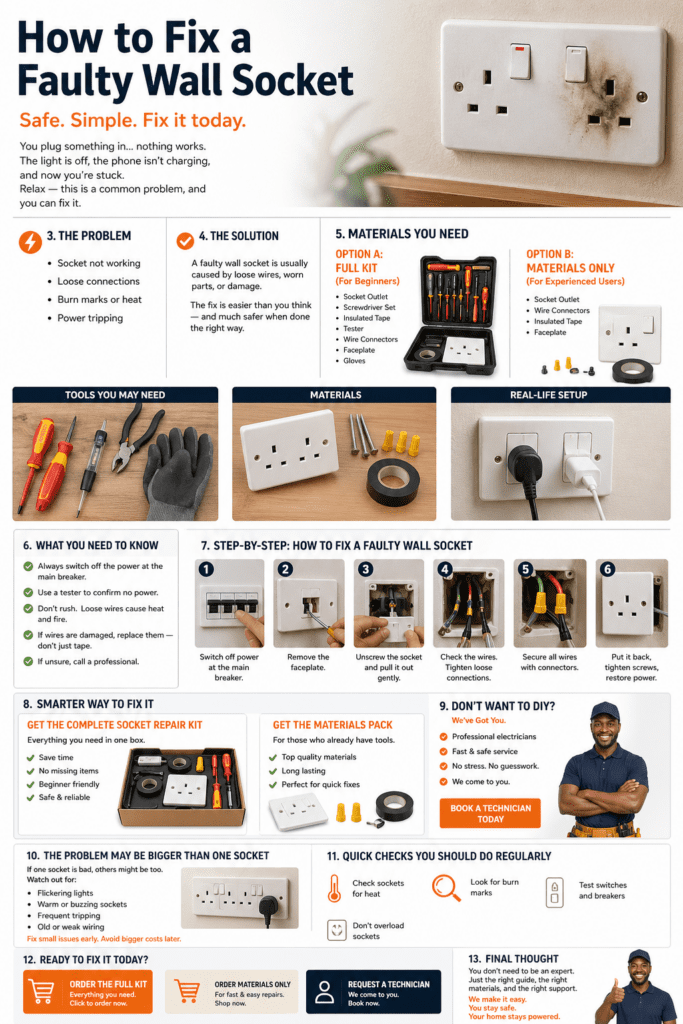
Materials You Need for Fixing a Faulty Wall Socket
Option A — Full Kit (Beginner Friendly)
If you want everything ready without stress:
- Screwdriver set (flat & star)
- Voltage tester
- Replacement wall socket
- Electrical tape
- Insulation gloves
- Fishing Tape
You have the opportunity to customise it however you want. (You pick your preferred tool from cetech’s large collection).
📸 Tools & Materials Setup


Option B — Materials Only (If You Already Have Tools)
- Replacement socket
- Wire connectors
- Electrical tape
- Spare screws for mounting
This is ideal if you already do basic home repairs.
What You Need to Know Before You Start (Very Important)
- Always ensure power is OFF before touching anything
- Don’t assume wires are safe—test first
- If you see burnt marks, replace the socket immediately
- Tight connections matter more than “just fitting it back”
Small mistake here can cause the same problem again.
Step-by-Step: How to Fix a Faulty Wall Socket
Step 1: Turn Off Power
Switch off electricity from the breaker before touching the socket.
Step 2: Remove the Socket Cover
Unscrew carefully and pull out gently.
Step 3: Check the Wiring
Look for:
- Loose wires
- Burnt ends
- Disconnected terminals
Step 4: Tighten or Replace Connections
Reconnect wires firmly into their correct points.
Step 5: Test Before Closing
Use a tester or plug in a simple device briefly.
Step 6: Close the Socket Back
Fix cover back properly and tighten screws.
📸 Repair Process (Real-Life View)


Make It Easier for Yourself
Instead of running around looking for parts, you can get:
Complete Socket Fix Kit
- Everything included
- No missing tools
- Faster repair
- Safer for beginners
Materials Pack Only
- For people who already have tools
- Quick replacement items
- Cost-effective option
This saves time and avoids buying wrong parts.
Need Help? (Service Option)
If you don’t want to risk it:
- A technician can fix it quickly
- No stress with wiring mistakes
- Safe and professional repair
- Ideal if you suspect deeper electrical issues
Sometimes peace of mind is worth more than DIY.
When One Faulty Socket Is a Bigger Warning
A single bad socket can mean:
- Other sockets are wearing out too
- Wiring in that room may be weak
- Overloaded circuits in the house
- Old electrical installation needing upgrade
So don’t ignore it if it keeps happening.
Quick Maintenance Habits You Should Do
To avoid future issues:
- Check sockets every few months
- Avoid overloading with many appliances
- Replace loose sockets early
- Watch for heat or burning smell
Small checks prevent big repairs.
Call to Action (What You Can Do Now)
You can:
- Get a Complete Fix Kit (everything ready)
- Buy Materials Only (if you already have tools)
- Request a Technician Service (fast and stress-free)
Pick what fits your situation best.
Final Word
A faulty wall socket is not something to ignore, but it’s also not something to panic about.
With the right tools, materials, or help, it’s a quick fix—and a good chance to prevent bigger electrical problems in your home later.
If you want, I can also turn this into a blog page design with layout, headings, and image placements ready for WordPress.